Change language

Follow us on


 Share
Share

Miter joints are a staple in woodworking, cabinetry, and stone fabrication, offering seamless and aesthetically pleasing connections at precise angles. However, achieving strong and durable miter joints requires proper miter clamping techniques. Using the right miter clamps or miter corner clamps ensures precision, stability, and long-lasting joints. In this guide, we'll explore the best practices to help you achieve flawless results.
A miter clamp is a specialized tool designed to hold two pieces of material together at an angle, typically 45 or 90 degrees, ensuring a precise and secure joint. These clamps are essential in woodworking, cabinetry, and stone fabrication, where accuracy is crucial. Miter clamps come in various designs, such as spring clamps, corner clamps, and suction-based clamps, each suited for different materials and applications.
Choosing the right miter clamp depends on the material and project type. Here are some common clamp types and their applications:
Before applying miter clamps, ensure that the two workpieces align perfectly. Any misalignment can lead to gaps and weak joints. Dry-fit the pieces together to check the accuracy of the cut.
Applying too much pressure can distort the joint, while too little pressure can result in gaps. Use miter corner clamps to apply even pressure along the entire joint for a snug fit.
For woodworking, apply a thin, even layer of wood glue along the mitered edges. For stone and granite, use industry-approved adhesives. Ensure the adhesive is evenly distributed before securing with miter clamps.
One common challenge in miter clamping is joint slippage. To prevent this:
For longer or wider workpieces, a single clamp may not provide enough pressure. Use multiple miter clamps evenly along the joint to maintain even pressure and prevent warping.
Once the miter clamps are secured, inspect the joint for any visible gaps. If necessary, adjust the pressure or reposition the clamps to achieve a tight seal.
Even experienced craftsmen can make mistakes when clamping miter joints. Here are some of the most common errors and how to prevent them:
To ensure long-lasting performance, regular maintenance is essential:
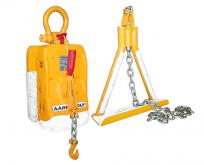
The Aardwolf ASMC250 Miter Clamp is a high-performance tool designed for precision clamping in stone fabrication, ideal for granite, marble, engineered stone, ceramic, and porcelain countertops. Its finished-side-up design ensures clear seam visibility for accurate adhesive application, while the auto-squaring mechanism maintains a precise 90-degree angle. Equipped with fine and coarse adjustment controls, it allows for seamless joint alignment. The high-strength suction cups provide a secure grip, preventing slippage during fabrication. Built from durable aluminum, the ASMC250 offers long-lasting performance. The comprehensive set includes two corner double clamps and two single clamps, enhancing versatility for different applications. This clamp is an essential tool for stone fabricators and installers seeking efficiency, precision, and reliability.
Mastering miter clamping techniques is essential for creating strong and durable joints in woodworking and stone fabrication. By choosing the right miter clamps, applying even pressure, and using proper alignment methods, you can achieve seamless and professional-quality results. Whether you're a professional fabricator or a DIY enthusiast, these techniques will help you enhance your craftsmanship and build stronger, more reliable joints.
Sign up to receive the latest info on new Aardwolf products, special offers and more.
By signing up you agree to receive emails from Aardwolf with news, special offers, promotions and other information. You can unsubscribe at any time.